This tool is available only in the Desktop version in the File menu and in the toolbar with the  Change Layer button to create a TIN vector model file from the selected vector layer or an individual attribute table.
![]() Export raster
Export raster
Opens the Rasterization: Export Raster Data panel to export the current map view as a georeferenced raster image or as sliced map tiles grouped by specified zoom levels = TILESET
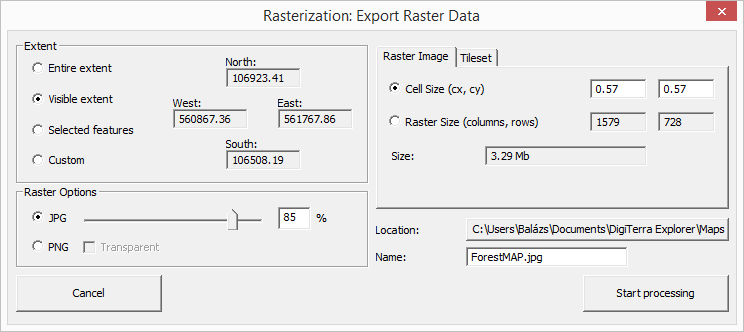
Rasterization with the Raster Image tab
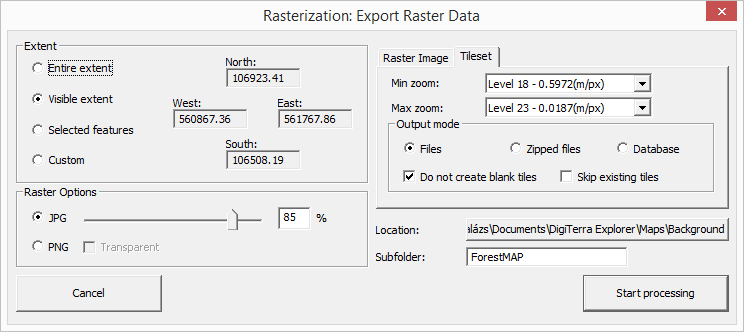
Rasterization with the Tileset tab
Common controls
Extent: defines the data frame on the map view to use when exporting. Default is Visible extent.
●Entire extent: option will export the entire extent of the map view
●Visible extent: option will export only the visible portion of the map view in the display
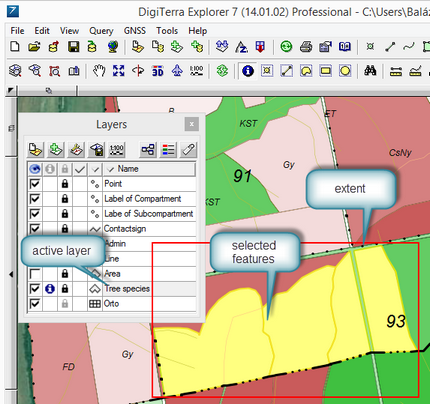
●Selected features: option will clip and export the map view based on the selected features in the active layer; this option will retain the data inside the graphic
●Custom: option will clip and export only the portion of the map view based on the manually entered map extent coordinates
oNorth, South, East, West: displays the map extent coordinates. Editable only when selecting the Custom radio button.
Selected features in the active layer
Raster Options: choose the format in which to save the raster export. You will be able to save the export to JPG or PNG. This includes situations where you are saving your map view to a JPG or PNG compression within a geodatabase. Default is JPG.
●JPG: If JPG format is chosen, then you can set the compression quality between 1 to 100. Default is 85%.
●PNG: If JPG format is chosen, then you can set the transparent option
oTransparent: The saved raster will be a transparent PNG. Default is unchecked.
Raster Image tab
●Cell Size (cx, cy): Displays the current pixel size. Changes the output raster size based on the entered pixel size values in x, y directions
●Raster Size (columns, rows): Displays the current raster size in columns/rows. Specifies the size of the raster image based on the adjusted values to your specifications.
The default is to export by using the cell size.
●Size: Displays the file size of the output raster image.
●Location: Displays the current working directory where the raster image will be saved. Opens the Browse for Folder panel to specify the output path.
Default Path: |
$DOCUMENTS\DigiTerra Explorer\Maps\ |
●Name: Displays the output file name with the selected extension. Default name is the map project name, that can be modified here.
Tileset tab
You can also export the map view into tiles, rather than a single raster image file using the Tileset tab. The Tileset tab allows you to tile the output according to the zoom levels to your specifications, among other options. Using the Tileset tab will tile the output according to predefined zoom level schemas.
●Min zoom: Lists the zoom levels to select the minimum zoom level.
●Max zoom: Lists the zoom levels to select the maximum zoom level.
Output mode:
●Files - The result of the tile export will be stored in individual files grouped by zoom levels in specified folders with an index.html file that will be opened in the default web browser.
●Zipped files - Same with the Files option, but the files will be compressed into a .ZIP file
●Database - The result of the tile export will be stored in an SQLite - DB3 geodatabase
The default option is Files.
●[x] Do not create blank tiles - The tile export will not create blank tiles when checking this option. Default is checked.
●[ ] Skip existing tiles - The tile export will not re-generating existing files when overwriting the content in the same Subfolder.
●Location:
Default Path: |
$DOCUMENTS\DigiTerra Explorer\Maps\Background |
●Subfolder: Displays the subfolder where the output will be saves. Default subfolder name is the map project name, that can be modified here.
Cancel - Closes the panel
Start processing - Starts the raster export with the specified export options