New Layer |
  
|
New Layer |
|
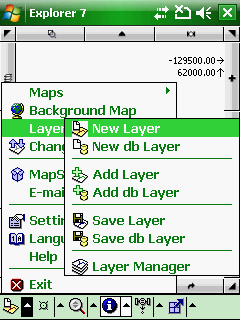
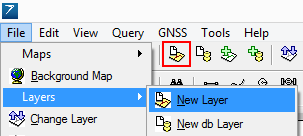
1.This command is accessible in the File menu > Layers sub-menu with the ![]() button and in the toolbar (Desktop version).
button and in the toolbar (Desktop version).
2.On the Layer Manager: tap on the ![]() New Layer button > then select the File option in the pop-up menu.
New Layer button > then select the File option in the pop-up menu.
Accessing to the New Layer command in the menu
Accessing to the New Layer command in the Desktop version
Accessing to the New Layer command in the Layer Manager
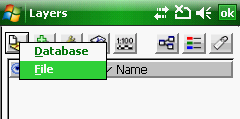
Opens the Create Layer File panel and then the New Layer panel to create a new (empty) layer. Opens the Database/File context menu on the Layer Manager.
Create Layer file panel
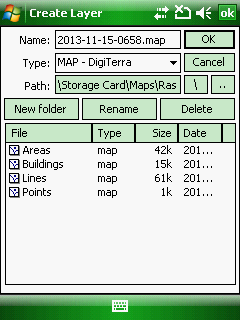
Supported formats on the Create Layer file panel:
- Vector: BNA, CRD, DAT, DGN, DXF, MAP, MIF/MID, SHP, ZIP(SHP)
- Tabular / Text: DBF, TAB, TXT
Default file name: today's date in YYYY-MM-DD-HHMM format
Default file format: MAP - DigiTerra
![]() For new users it is recommended to use the default MAP - DigiTerra file format to collect data in a vector layer. The layer can be easily exported with the
For new users it is recommended to use the default MAP - DigiTerra file format to collect data in a vector layer. The layer can be easily exported with the ![]() Save Layer command in the Layers sub-menu or on the Layer Manager.
Save Layer command in the Layers sub-menu or on the Layer Manager.
|
Basic |
Advanced |
Professional |
Supported vector formats with the New Layer command |
|||
BNA - Atlas GIS |
|
|
|
CRD - Coordinates (point) |
|
|
|
DAT - Coordinates (shape) |
|
|
|
DGN - Microstation |
|
|
|
DXF - Autodesk |
|
|
|
MAP - DigiTerra |
|
|
|
MIF - Mapinfo Interchange |
|
|
|
SHP - ESRI Shape |
|
|
|
ZIP - Zipped ESRI Shape |
|
|
|
Supported tabular / text formats with the New Layer command |
|||
DBF - dBase |
|
|
|
TAB - DigiTerra |
|
|
|
TXT - Text files |
|
|
|